Cron jobs are scheduled tasks that the system runs at already set times or intervals. A cron job generally contains a series of simple tasks that the system runs from script file. The Cron Jobs feature in cPanel is very useful when it comes to setting up automated maintenance and other unmanned server duties. For example, you could set a cron job to delete temporary files every week so that your disk space is not being used up by those files.
To create a cron job:
- Log into cPanel.
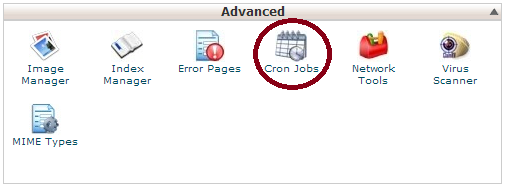
- In the Advanced section, click Cron Jobs.

- Under Cron Email, enter an email address for the system to send notifications when your cron job runs. Click Update Email. You will receive an email after the cron job has finished.

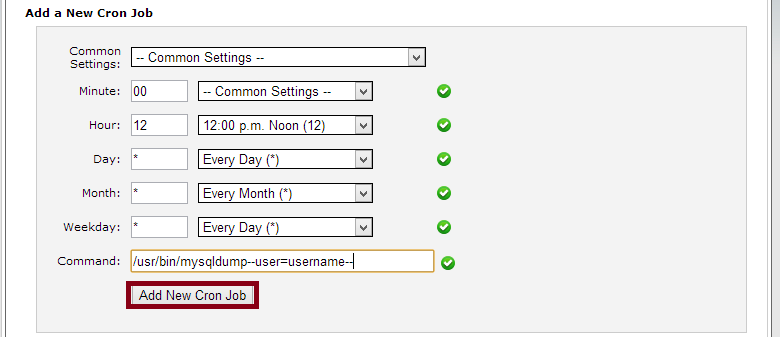
- Under Add New Cron Job, use the Common Settings drop-down menu to choose from a list of regularly used intervals; or set the frequency of your cron job by using the drop-down box next to each time unit. Common settings range from every minute to once a year.

- Common Settings — This menu allows you to select a commonly used interval. The system will configure the appropriate settings in the Minute, Hour, Day, Month, and Weekday text boxes for you.
- Minute — this allows you to select the number of minutes between each time the cron job runs, or the minute of each hour on which you wish to run the cron job.
- Hour — this allows you to select the number of hours between each time the cron job runs, or the hour of each day on which you wish to run the cron job.
- Day — this allows you to select the number of days between each time the cron job runs, or the day of the month on which you wish to run the cron job.
- Month — this menu allows you to select the number of months between each time the cron job runs, or the month of the year in which you wish to run the cron job.
- Weekday — this allows you to select the days of the week on which you wish to run the cron job.
- In the Command field, enter the desired command for the system to run.
- Click Add New Cron Job.
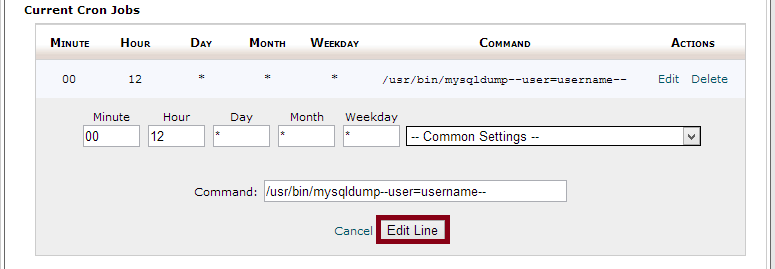
You will be able to view your existing cron jobs under the Current Cron Jobs table that is displayed at the bottom of the page immediately a cron job is created.
To edit a Cron Job:
To edit a cron job, perform the following steps:
- Log into your cPanel account and click on Cron Jobs.
- Under the Current Cron Jobs table at the bottom of the page, locate the cron job that you wish to edit and click Edit under Actions heading.

- Edit the settings that you wish to change and click Edit Line.

To delete a Cron Job
To delete a cron job, perform the following steps.
- Log into your cPanel account and click on Cron Jobs.
- Under the Current Cron Jobs table at the bottom of the page, locate the cron job that you wish to remove and click Delete under Actions heading.

- Confirm your action by clicking Delete.

In need of a website/looking for a reliable web hosting service provider? Get one at a discounted rate at CloudhostAfrica today.
Leave a Reply