 To manage your FTP accounts, you can make use of the FTP accounts table. There are various operations you can carry out using this interface. You can change password or quota and some other simple operations.
Change Password
You can change the password for your FTP account by following the steps below.
- Log into your cPanel account.
- Locate the FTP Accounts icon under the Files section and click on it.

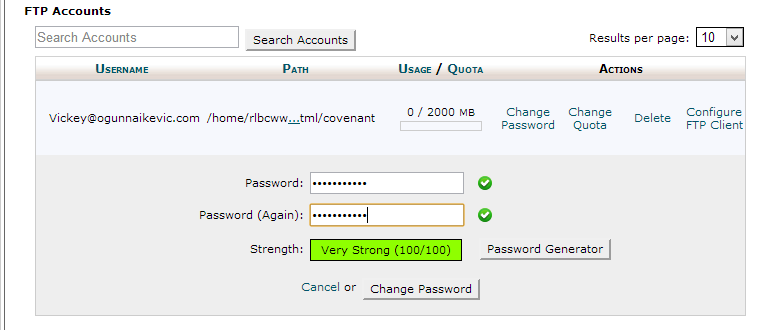
- You will be directed to a new page where you will see the list of FTP accounts. Under the account you wish to change password, click on the Change Password icon.

- On the newly loaded page, fill in the new password you wish to use.

- You can now click on the Change Password button. Your password has been changed.
Change Quota
You can also change the disk space quota used by a user. Simply:
- Click on the FTP Accounts icon under the Files section.
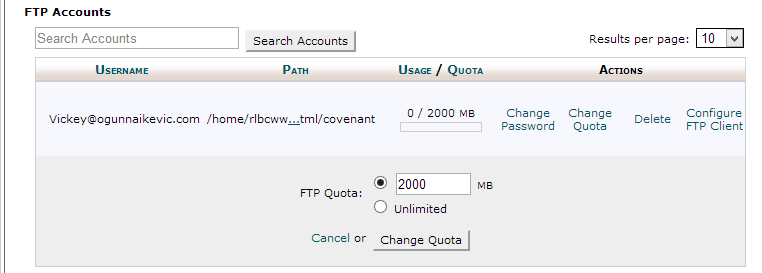
- Locate the account for which you want to change quota and click on the Change Quota button.

- A setup page will be displayed.

- Here, you will fill in the disk space quota or you can decide to go with the Unlimited FTP quota.
- Now, click on Change Quota and you are done.
Deleting an account
Now, that is not all you can do using the FTP Account table. You can also delete an FTP account from your cPanel account.
- Click on FTP Accounts icon once again under the File section.
- Navigate to the account you wish to delete and click on the the Delete icon.

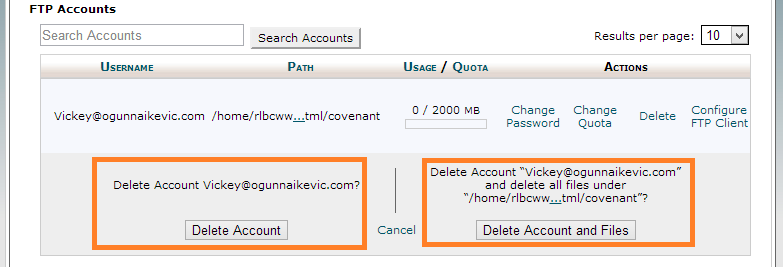
- Two options will be displayed as shown.

If you select Delete Account, only the account is removed. But if you choose Delete Account and Files, the account and all the files related to it will be deleted. You should be warned that if you select the latter, the files in the FTP folder will be deleted and can only be recovered with backup. - You can now click on the option you wish to use and the account will be deleted.
Configure FTP Client
You can configure your FTP client using the following steps:
- Open the FTP Accounts under the Files section.
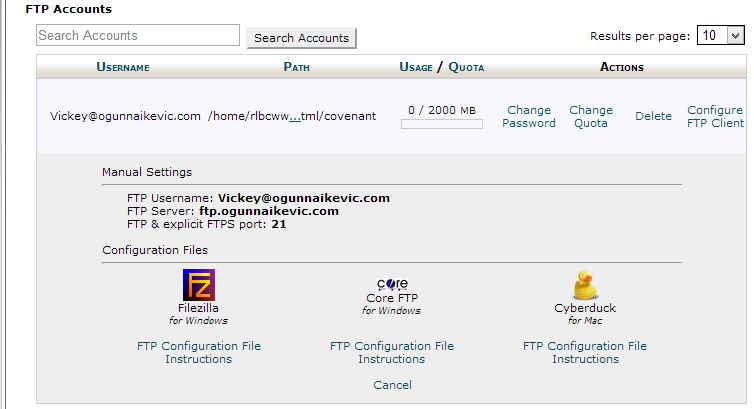
- Click on Configure FTP Client under the desired account.

- On the drop down screen, you will see some FTP client logos.
 Click on FTP Configuration File under the desired FTP client’s logo.
 - Once this is done, the configuration script fiile will be downloaded on your computer.
- Open it and the FTP client opens automatically, configures itself and connects to your FTP server.
For more questions, let us help you!
Pingbacks/Trackbacks
[…] Managing a cPanel Account […]